Showing posts with label language. Show all posts

Bottle Caps Fun - Teaching Maths and Language For Ages 2-5

I have been wanting to collect enough bottlecaps for a long time. However, the various drinks I had were all of different kinds.. SO I made a commitment to drink only one type of ice coffee for a week (just see the sacrifices a mother has to make) and managed to collect my 21 white caps and 5 blue caps. Only then I managed my phonic game. The white caps are for consonants while the blue caps are for vowels. I pasted stickers on them and wrote all the alphabets. This was for Ko to sing the phonic song to the tune of abc song. Instead of singing the abc song, you sing "air, ber, ker, der" by using an animal. For me I used a stickee, something with a suction that could stick to certain surfaces. She loves songs so she really enjoyed it. 


I thought that was the end of the bottlecaps lifespan till we did another activity lately... a marble run activity! I got the inspiration from one of my favourite blogs: A happy mum.
In her blog, she did not use bottle caps but made her own marble holder using toilet rolls. I improvised it at the last minute and tada!! Anyway, let me share what I did with them. Time is on my side as it is the school holidays. However, it can be difficult trying to let them do certain activities due to their age difference, thus art is always the perfect way: it is time consuming and you might create a future artist!:) 

This was what I used:

1) 3 rolls of washi tapes or coloured tapes
2) Collected around 10 (toilet rolls and kitchen rolls)
3) Marbles
4) Paints (optional)
5) Wrapping paper (optional)
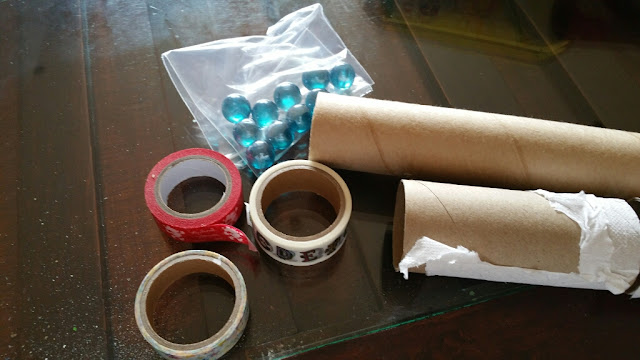

You can also use cotton balls if the marbles are too noisy.


For Imm, I let him wrap the toilet rolls with paper as he enjoyed using glue. He also painted some toilet rolls.


For Ko, I let her use more of the washi tape. I would cut the lengths and she would paste them on. It does not matter if she does not paste properly as I would just help her to tape it over later on. It kept her really occupied for sometime, whew! Otherwise, her favourite complaints are always she is hungry.


After a few days of work (yes a few days as their attention span isn't too long), I set up this marble run when they were sleeping. I thought it was pretty easy from the blog post I saw but I realised I had to do adjustments, the gravity matters and I had to soften the impact of the marbles using slopes so the marbles would not suddenly fall out. Anyway, you could see the batman one; that was painted by Imm while for the princess one, I cut out some princess pictures for Ko to paste.


You must be wondering what the bottlecaps are for now. I used the other side and paste them into a box (they tend to shift when the marbles hit them). I wrote numbers on them so it could become a "points" game. For Imm, it was more for addition while for Ko, it was for recognising numbers. They really enjoyed it!


Thus, what I learnt was not to discard materials that you had painstakingly collected but to think of other ways to use them. It matters! Or else I have to drink 20 bottles of coffee again.

Christmas Part 2 and End of The Year

To wrap up our Christmas celebrations, we went to the Snowplay area near our place again! This time both of them played pretty long there and Ko enjoyed herself much better with Imm around. He will say things like let us make a castle or ask "can you make the door with me?" and she will be more engaged. Definitely much more fun to be around! :)


Hello Mr Snowman!!!!!!!!!! :)


Ko is a real fan of gingerbread man so I asked if she could help gingerbread man put buttons on for his friend...


I prepared a number die...


And some nice buttons.


There you go gingerbread man!!


Another counting game using montessori counters.


For Language, we did this preposition book which I did sometime ago... do just for revision...


A finger training game to pick up the cotton balls....


Matching small to capital letters... A Christmas Lights theme...


For both of them, I took out some chalks and let them draw on the balcony floor since it could be washed away easily...


I guess this pretty much wrapped up what we did during the end of the year. To me, seeing my kids happy faces most of the time are the greatest blessings. Their innocence and joy truly rubbed off on me and I look forward to yet another year growing up with them and having fun.

The Long Road to Literacy

I have been postponing teaching Ko the letters till she was about 2 years old as I was still feeling the remnants of the exasperation with Imm when I was teaching him reading. But I realised I better get started. Also, she does not show much interest in letters in the beginning unlike for Imm. She enjoys singing and catches on easily in singing both Eng and Chinese songs but runs away when she sees letters. Maybe because I started to act like an anxious kiasu Sinaporean Shichida ex teacher filled with anxiety that it started to rub off on her, even though I always tell myself to chill. Anyway, my motto in teaching is always to have fun. Only when Imm had chicken pox and is stuck in Spore, I started to spend more time to teach her. Maybe that's how it is with the second kid. Always having remnants of the time, energy etc. 

I started doing these alphabet cubes sometime ago. They are used from the Happy Meal Macdonald Boxes. As I mentioned from another post eons ago, they have other uses (from another game). I love these. Each letter will correspond to each picture and we will try to throw it together. Sometimes, Ko will go "vvvvv" (sound) witch!" which makes me collapse on the floor with my hands in the air or she will give a gleeful "ffff" tiger! And we start to redo our alphabet dice again.


One thing I did lately was to think of a simple game like these. Found these magnetic paper in my stash. They are bought from daiso and I finally have some use for it. What is good for these paper is that they can be printed directly on it. But I didn't as I wanted my alphabets to be mixed up. 


I printed these alphabets from http://pdf.mrprintables.com/mrpac02-lc.pdf and cut them out before pasting them with derision onto each B5 piece. For each card, there are letters with sounds she already knew, thus it would not look absolutely foreign to her. Also, I made sure not to put "b" and "p" together for less confusion,


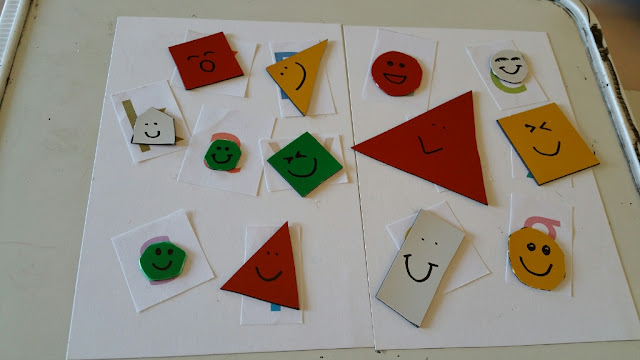
I cut out some shapes from magnetic paper as I was planning to play this game on the magnetic board. I then "hid" each letter behind the shape. I will ask her in Chinese, "who is hiding behind the red triangle?" And she will remove that particular shape. Then I will say the letter sound. I did it in an extreme high pitch voice of excitement to stir interest. What surprised me was that she enjoyed it so much that she wanted to play all of the cards. Which was good. :)


I printed out these worksheets from www.overthebigmoon.com and used our do-a- dot markers to play to emphasize the letter I wanted her to learn that day.


I found out recently that she enjoyed tracing and could follow dotted lines these days.


So far, she knows sounds of c, f, m, o, r, s, v, z confidently so we have lots more to work on. :) I started with a.b, c first but realised she gets confused easily with a and b but could catch c easily though I spent much less time on it. I started teaching letters which are more obvious in shape and sound.

1) c
2) o
3) s
4) f
5) m
6) z

Figuring out which to teach next. :)

Recognition of Animal Words In Chinese

I have always believed that children learn much better when they are engaged doing a practical activity, which is why I would rack my brains to engage them this way, no matter how lame the method is. And it also helps me to develop my silly side. :) I wanted to introduce the recognition of these words in Chinese. I started with the ones that were easy to write : 羊,牛 as the strokes were the least. For the sheep, I printed a picture of the sheep and laminated it. Then I pasted a piece of soft laminating paper over it and gave Imm some cotton balls to paste on the sheep so that it looks like wool.


For the cow, I printed 2 pictures of the cow and used a cardboard paper to put in the middle of the two pictures for support. I then made a hole in the cardboard and put a pacifier through it so that he could "milk" the cow and understand that cows produced the milk that we drink.


The pacifier was supposed to be the "teat". The kids were super amused by it.


At the end of it all, I revised again by putting the word next to the pictures.


Next, I focused on 鸟 and 鱼. And this time was more art and craft session using the paper plates. I will usually print out a picture of what I wanted them to do, to let them have an idea.


This was what I prepared:
1) Some buttons
2) Foam paper (if you wanted to add a beak)
3) 2 paper plates in which I pasted 2 colours of construction paper and cut them out according to the shape of the paper plates (see below)
4) Glue
5) 2 colours of feathers
5) Eyes


We used the buttons to paste on one side. I poked holes at the end to allow them to insert the feathers.


It was a fast job as I had to help with 2 kids. Nothing complicated. I didn't add the beak for this but used the foam paper for the fish instead.


Check out Imm's wry look! Hahaha.. "Mummy is asking me to pose again."


Next, we did which was even easier. I asked them to paint their favorite color using powder paint and they pasted the foam that I had cut out (which was the fins and tail). We then pasted the eye and drew the mouth. A pic with 表姨!


Next is the writing!


Craft #7 J for Jellyfish

It is as though we don't have enough of art lessons and we still do lots of painting at home. :) For me, the job of preparing and clearing up is less tiring than when both of them wants me to read different books at the same type. It seemed like a competition that whoever wins whenever I read the book he/she has chosen. Oh well. 

And I will do something simple that finishes in 1 hour, before hub comes back to rescue me. Last week, we focused on the letter J!

Materials:

1) two paper plates, folded them in and punched holes.
2) crepe paper of different colours
3) red foam paper


Then I cut out the eyes and mouths using foam paper.


Their job is really very simple, painting the jellyfish in their chosen color. I would cut out the strips of crepe paper for them and then insert into their holes in an alternate way.


I would then use tape and put behind the eyes and mouths and they would paste it on themselves. Tada!


A showerhead?


Happy with their masterpiece!